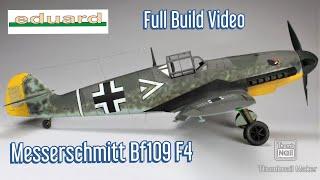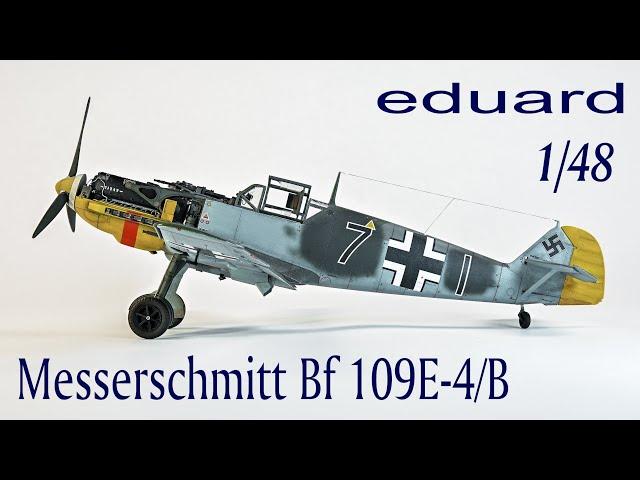
Messerschmitt Bf109 E-4/B Full Build - Eduard 1/48
Комментарии:

Really nice job on your build. I especially like the effort you put into the sliding windows. Obviously a lot of work, but it's not a detail you see very often.
Ответить
Your eye for detail is impeccable and your scratch building is world class. That was an absolute treat to watch.
Ответить
The small alloy tubing, where do you get this? I managed to find the lead wire at a fishing tackle shop and they also have a lot of very small copper wire.
Ответить
Hi, great video, love the build and painting. Do you give your airbrush a thorough clean between colours? and also do you use a spray boòth with an extractor fan. Best regards Paul
Ответить
Looks Great,Good Job!👍
Ответить
Wow, that was a real tour de force in adding exquisitely fine extra detail. Proper respect. I like how you recognise that not every warplane is a weary warrior and that some would be lost with very few operational hours on them.
Ответить
Awesome build my friend keep up the good work
Ответить
Superb job, very skillfully executed. I watched this thinking I needed something to emulate. Err, not a chance. Lightyears ahead of my abilities. 👏
Ответить
I love all the added detail - absolutely stunning!
Ответить
Sheer skill! simple as that. the sliding canopy windows blew my mind. Sincere congratulations sir.
Ответить
Your attention to detail is phenomenal. Adjusting the pedals and the stick to fit the offset allerons and rudder on a 1/48-scale is flat-out extra-mile schiesse, probably only noticeable by A-retentive builders like us.
Ответить
Dude! your killing me with your amazing builds and attention to detail. If I were to try that my model would be ruined but you make it look so easy. Keep up the fantastic builds , just added your channel ✌Canada✌
Ответить
Absolutely stunning, what else can I say, we'll done!!!
Ответить
Super! Your work is magnificent. Just one observation on the canopy. I believe it had a cable to hold it in the open position. That would totally finish all the work you did!
Ответить
I just picked this model up, im a beginner, so I’ll never get it this good but I hope I can at least get a decent paint job on it
Ответить
Kudos to you for the magnificent build and its outstanding attention to detail & precision.
As someone who has been around many operational military aircraft, and closely studied thousands of photos of operational WWII a/c, I have a few observations. Where fabric is stitched to ribs on control surfaces, it is
covered with cloth tape strips, which in turn are "doped" to the "doped" underlying fabric. Consequently, shiny alloy metal will never be seen on these surfaces (indeed, rivets are not present except at intersections of ribs and frames). Nuts and bolt heads on the DB601/605 engine crankcase top cover will never be shiny & devoid of paint, unless the cover has been removed for major service--often unlikely, as it was usually faster to just install a new engine. Wings and fuselage were not overall oily & grimey. Especially, wings outboard of wheel wells, unless the plane literally flew through the smoke of a burning oil refinery. Early in the war, at the time of BoB (your Bf-109 model), German a/c were well-maintained from an appearance standpoint. Major aces', Kommodores' & Kommandeures' a/c were often washed after every mission, even frequently waxed. In general, most German combat a/c on Western front did not get the well-used, worn look before 1944, because time & facilities enabled more & better cosmetic care, and attrition prevented most a/c from becoming "old". Also of note, German paint chipped & flaked much less than, say, Japanese or U.S. paint. Well-used metal (not wood) prop blades would show paint wear primarily on the rear faces, a "sand-blasted" appearance, heaviest at the tips, gradually lessening until the blade midpoint. Chips and wear were much less on blade front surfaces.
All this is offered in the spirit of striving for utmost authentic appearance.

Utterly magnificent! One of the best 1/48 build videos I have watched on eBay. Thank you for going to such great detail, especially your travails surrounding the opening sliding canopy windows - you have both inspired us and saved us a lot of time and frustration.
Ответить
Masterful work! Thank you for some very valuable information!
Ответить
You are truly a master👏👏👏
Ответить
Absolutely magnificent build! The amount of effort you put into your model is remarkable and I especially liked your commentary. Very descriptive and your tips were very helpful. Thank you for posting I look forward to watching your other videos.
Ответить
Watching your video before starting to build my border kit 1/35! Really nice job! You alive the kit adding so much detail!
But there is a question to the base painting. Quite the same problem I facing too. It is the effect of orange peel.

Great build!
I love the paint scheme. The red band is a ”shame band”. A punishment from Göring as the div. Commander had married a jewish woman. As an answer to this, the whole division removed the swastikas on the tails of their airplanes. A great story and a wonderfull modelling subject!

Very nice! But all that effort and you don't flatten the bottom of the tires? One simple thing that adds so much realism.
Ответить
what patience you have , love to see great building , Amazing
Ответить
Fabulous. I have this kit in my stash, I hope I can get somewhere near to this magnificent finish. I doubt that anyone could though.
Ответить
Thank you for using the swastika...to many snowflakes around.
Ответить
Genial trabajo felicidades!!!!!!
Ответить
Hi there, I have a question. I see you are using Tamiya metalics in your airbrush. I'm a beginner and when i tried these colours with various thinner ratios, my airbrush would always clog up so i switched to other brand for metalics. Is there some trick to Tamiya? What ratio and thinner do you use?
Ответить
My God Man .....No Words ....Im Speechless !!!!!!!!!!!!!!!!!!!!!!!!!!!!!!!!!!!!!!!!!!!!!!!!!!!
Ответить
That is really excellent work on that kit. One small point (NOT a criticism but a pointer) Tamiya RLM grey is actually Heeres (German Army) Feldgrau, which is too dark in tone and too green in hue to replicate RLM 02 primer grey. Fortunately there is an easy fix - Add between 30 and 50% white or a very pale grey to the XF22 and mix in 1 drop of yellow. This should give you a mid-toned Greenish grey, which will be a close approximation of RLM 02. (I use Mr Color lacquers and find their RLM 02 also to be a little too dark and green, so I add in a few drops of white and 1 of yellow. There are good color images that show RLM02 could fade to a yellow-green color after some time in the sun.) I guess I am saying that you should always double check the color guides in any kit, as often the manufacturers (even Eduard, who take a good deal of care with their options) can be misled by a poor or outdated original reference. Case in Point: Look up the History of the pilots and markings of a P-47N based on Ie Shima in 1945 named "2 Big and 2 Heavy". That plane had 3 differing marking phases (and 3 different pilots!)and most decals sheets (including most Aftermarket!!) have mixed them up really badly. There is a very good web page on the unit that explains the ins and outs very well.
Ответить
Great to have commentary!
Ответить
Absolutely outstanding work!!👏
Ответить
I make all my planes as if they are brand new as well but for different reasons - my weathering skills aren't up to it. Stunning build and super attention to detail. Happy modelling
Ответить
I have recently subscribed to your channel and you scratch-building/detail work is fantastic and really inspiring. A real pleasure to watch. Thank-you.
Ответить
Very nice work. Great Bf-109. Greetings , Aleš 🙂👍
Ответить
Absolutely impressive! You have inspired me to go that little extra mile on future builds.
Ответить
Bardzo ładnie. Ale nakładał bym trochę cieńsze warstwy farby, bo cały efekt który wcześniej robisz zanika.
Ответить
Bravo. Le plus beau montage de Bf109 que j ai vu jusqu'à présent. Tres haut niveau de détails.
Je vais appliquer tes techniques pour le pré-ombrage .
Je m abonne car tu es vraiment un très grand artiste.
Félicitations

This is a amazing job 🙏💎👏
Your eyes are really goods … Mine just in dream 😂

Stunning
Ответить
Excellent. A real inspiration. Thank You
Ответить
If Willy Messerschmitt was alive, you would receive much gratitude & prayers
Ответить
Na jó... innen azért lopok pár dolgot 😁😁😍
Ответить
Amazing detail! You have more patience and better eyesight than I do! 😂 I especially liked the replacing of the canopy side windows so you could have them in the open position.
Ответить
Great stuff 👍🇳🇿
Ответить
Thanks for this vid - I’m just getting back in so have learnt a lot. I did same kind of thing with engine and cowling guns but behind the engine it’s difficult to get the resources - the connecting rods. There are another bunch of wires on port side of ammo boxes that lead to the super charger - there are two brackets on starboard side - a vent and a starter handle hole - the yellow wires (fuel) inside the cockpit are a little contentious because they are in the museum Munich but I believe they are incorrect as the fuel lines are on top of tank under the cockpit.
That said it’s still an awesome build that is an inspiration!

Your end result is quite well done!!
Ответить





![Karen new song Say no more by Joelni [OFFICIAL MV] Karen new song Say no more by Joelni [OFFICIAL MV]](https://invideo.cc/img/upload/VWZqOGxxN1R3NFU.jpg)
