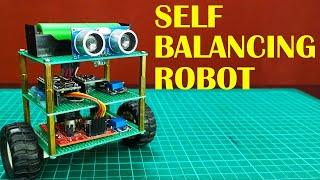
How to make Self balancing robot using Arduino | 2 Wheel | MPU 6050 | Boost Converter | Motor Driver
How to make a Self Balancing Robot | Arduino NANO | MPU6050 | Boost Converter | Motor Driver
#selfbalancingrobot #roboticsengineering #roboticstutorial #arduinoprojects #arduinocoding
#arduinocommunity #arduino #arduinoproject #nano #arduinonano #arduinouno #arduinomega
#mpu_vorbereitung_salzgitter #mpu6050 #mpu_vorbereitung #boost #boostconverter #booster #motordriver #l293d #l298n #channel #youtube #youtubeshorts #diyelectronics #homemade #electronics #electronicstutorial #electroniccircuits #electronic
Welcome, everyone!
Today, I'm thrilled to guide you through the exciting process of constructing your very own self-balancing robot, capable of navigating its surroundings with agility while dodging obstacles along the way. This compact marvel is centered around the Arduino NANO development board and the MPU6050 accelerometer-gyroscope module.
Throughout this tutorial, we'll delve into integrating the MPU6050 with Arduino, deciphering the robot's inclination angle, and harnessing the power of PID (Proportional-Integral-Derivative) control to maintain impeccable balance. Additionally, we'll incorporate an ultrasonic rangefinder into our robot, ensuring it gracefully sidesteps any obstacles encountered during its explorations.
Now, let's take a glance at the components you'll need to embark on this thrilling journey:
Arduino Nano
GY-521 module featuring the MPU-6050
Motor driver
Two boost converters
US-020 ultrasonic distance sensor
18650 battery with holder
A pair of micro metal gear motors (N20, 6V, 200 rpm) with brackets
Two 42x19mm wheels
Three prototype PCBs
PCB spacers
In addition to these components, you'll require some cables, berg connectors, and an on/off switch to bring your creation to life.
Step 1: Understanding the Basics
Before we dive into the assembly process, let's grasp some fundamental concepts. Picture a self-balancing robot as an upside-down pendulum. Unlike a traditional pendulum that naturally swings back and forth, our inverted pendulum struggles to maintain balance independently—it's prone to tipping over. So, how do we keep it upright? Imagine balancing a broomstick on your fingertip—a classic analogy for stabilizing an inverted pendulum. Just as we adjust our finger's position to counter the stick's lean, we'll manipulate the robot's wheel movements to counter its impending fall. The goal is simple: keep the robot's center of gravity precisely above its pivot point.
To accomplish this feat, we need vital information about the robot's state: its direction of tilt, degree of inclination, and falling velocity. These insights are gleaned from the MPU6050 readings. By synthesizing these inputs, we generate a control signal that regulates the motors, ensuring the robot maintains its equilibrium.
Assembly and Calibration
Follow the assembly instructions outlined in the accompanying video, and don't forget to calibrate the MPU6050 on a level surface as demonstrated.
Fine-Tuning PID Constants
Once assembled, it's time to fine-tune the PID constants for optimal performance:
Start by setting Ki and Kd to zero, gradually increasing Kp until the robot exhibits slight oscillations around the zero position.
Increment Ki to enhance the robot's response to imbalance, ensuring it swiftly corrects deviations from the upright position without exacerbating tilt.
Introduce Kd to dampen oscillations and minimize overshoot.
Iterate through these steps, meticulously adjusting each parameter until you achieve the desired outcome: a self-balancing robot that navigates with poise and precision.
Don't forget to like, subscribe, and hit the notification bell on my channel, 'ERL Engineering', for more fascinating projects like this one! Join me on this exhilarating journey as we bring our self-balancing robot to life, mastering the art of equilibrium along the way. Let's get started!
Тэги:
##ArduinoProjects ##DIYRobotics ##MPU6050 ##PIDControl ##UltrasonicSensor ##RoboticsTutorial ##ElectronicsProjects ##MakerCommunity ##EngineeringTutorial ##RoboticsEngineering ##STEMEducation ##TechnologyTutorial ##ElectronicsTutorial ##ArduinoNano ##ArduinoProgramming ##ArduinoCommunity ##MPU6050Sensor ##LithiumIonBattery ##BatteryPoweredProjects ##MotorDriver ##DCMotorControl ##DIYElectronics ##MicrocontrollerProjects ##ElectricalEngineering ##MechanicalEngineering ##ElectronicComponents. #selfbalancingrobotКомментарии:
Лучшие беззеркалки цена качество
"Смена" видеоблог о фотографии
Обзор экспериментального мотоцикла Иж планета 6
РетроИж - Все о Ижевских Мотоциклах
What is a Performance Clutch Kit
clutchindustries
34. [Hindi] : Explore States is UiPath RE Framework in Hindi | Initialization | End State हिंदी
Tutorials by Mukesh Kala
Kids Playing Roblox be like
BENBROS


![Крутой фильм 2021 [ ОДНОРУКИЙ СНАЙПЕР ] Русские боевики 2021 новинки HD 1080P Крутой фильм 2021 [ ОДНОРУКИЙ СНАЙПЕР ] Русские боевики 2021 новинки HD 1080P](https://invideo.cc/img/upload/Y1M3QllsckVpNUI.jpg)

![34. [Hindi] : Explore States is UiPath RE Framework in Hindi | Initialization | End State हिंदी 34. [Hindi] : Explore States is UiPath RE Framework in Hindi | Initialization | End State हिंदी](https://invideo.cc/img/upload/VW5sZF9PUWswWGM.jpg)
![[FREE FOR PROFIT] Melodic Type Beat - "Forget Me" [FREE FOR PROFIT] Melodic Type Beat - "Forget Me"](https://invideo.cc/img/upload/Z3BzeWVYZU1teU4.jpg)


